
How are retractable grandstand seats installed?
How Are Retractable Grandstand Seats Installed?
Cangzhou Yunxinda is a professional manufacturer of modular retractable telescopic bleachers in Yanshan, Hebei, China. All our retractable grandstands adopt bolted modular design without on-site welding, which greatly simplifies transportation and on-site installation. Below is the standard complete installation process.
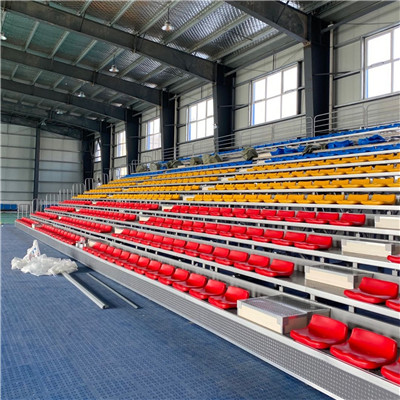
Step 1: On-site Measurement & Site Preparation
Measure the venue’s wall length, floor flatness, ceiling height and reserved evacuation passages according to the customer’s layout drawing.
Clean the installation area: remove gravel, protrusions and oil stains on the ground. The ground must be flat, solid and load-bearing (PVC floor, epoxy floor, cement floor are all compatible).
Mark positioning lines on the floor with ink lines, including the overall outline of the bleacher, wheel track range and wall fixing anchor points.
Reserve power supply position for electric bleachers: leave a 220V power socket within 3 meters of the control box.
Step 2: Assemble the Main Steel Frame Modules
Our retractable grandstands are split into independent standard modules for container delivery.
Place the bottom base frame according to the marked positioning line, align each module horizontally and vertically.
Connect adjacent frames with high-strength bolts, tighten all joints evenly to ensure the whole frame is integrated without loose gaps.
Install cross diagonal bracing between layers to enhance stability, lock all supporting fasteners.
For wall-mounted retractable bleachers: drill expansion bolts on the wall and fix the rear of the frame to prevent tipping over when fully extended.
Step 3: Install Walking Wheels & Synchronous Drive System
Manual retractable bleachers
Install PU silent load-bearing casters at the bottom of each base frame, lock the brake nuts.
Mount the hand crank transmission shaft and connect the synchronous linkage rod between each tier.
Test manual pushing & pulling to check if all tiers stretch and retract in parallel without jamming or deviation.
Electric retractable bleachers
Install double-sided synchronous guide chains on both sides of the frame, adjust chain tightness to keep left-right synchronization.
Fix the deceleration motor and main control box at the side of the first tier, connect power cables and wrap wiring with protective tubes.
Install limit sensors at the fully extended and fully retracted positions for automatic stop protection.
Pair the wireless remote controller and test wired panel control functions.
Hydraulic retractable bleachers
Install hydraulic cylinders and oil pipelines, add anti-leakage gaskets, debug hydraulic pressure to realize low-noise smooth expansion.
Step 4: Lay Anti-slip Step Platform Panels
Place multi-layer anti-slip plywood or aluminum alloy step boards on each tier beam.
Fix the panels with self-tapping screws, install aluminum anti-collision edging strips on the front of each step.
Mount closed side baffles on both sides of the bleacher to avoid foreign objects entering the drive structure.
Step 5: Mount Retractable Flip Spectator Seats
Two types of seats follow different installation steps:
Front flip seats (for basketball gyms):
Fix the four-linkage flip support bracket on the front beam of each tier, then fasten the integrated blow-molded PP seat to the bracket. Test automatic downward flipping when unoccupied.
Rear backrest seats (for multi-purpose arenas):
Install seat bases on the rear platform, assemble seat plate, backrest and aluminum armrests one by one, adjust flip tightness to ensure silent rebound without collision.
Step 6: Install Safety Protection Accessories
Install height guardrails on the side of evacuation aisles, ensure the passage width meets fire standards (≥900mm).
Attach anti-drop baffles on the front edge of each tier to prevent spectators or items from falling.
Install anti-pinch isolation plates at the bottom gap between tiers to avoid clamping hazards during retraction.
Paste warning labels on the control box and side frame: emergency stop prompt, load limit warning.
Step 7: Overall Debugging & Full Safety Inspection
Full stretch and full retraction test repeatedly 10–15 times, check for stuck wheels, abnormal noise, offset tiers or loose bolts.
Electric model test emergency stop, overload protection and limit automatic shutdown functions.
Static load test: place heavy objects evenly on each step to check frame deformation and bearing stability.
Check all bolt tightness, wire insulation, brake locking function of bottom casters.
Clean the whole bleacher, remove installation waste and packaging materials.
Step 8: Handover & Operation Training
After passing the safety inspection, our technical team will teach customers daily operation, simple fault troubleshooting and regular maintenance methods:
How to use remote control / hand crank
Lubrication cycle of chain and wheel bearings
Daily cleaning and rust prevention tips for steel frames
Seat plastic maintenance precautions
Yunxinda Installation Advantages
Modular split design, no on-site welding, short installation cycle (standard bleachers finished within 1–3 days).
Professional installation drawings and detailed English installation manuals provided for overseas customers.
Overseas large stadium projects support sending engineers for on-site guidance.
Complete matching spare parts supplied together with bleachers for later replacement and maintenance.
Common Application Venues
Indoor basketball gym, school sports hall, university arena, community multi-function auditorium, indoor badminton venue, sports competition stadium